Custom Validator Extension
Exposing hidden features of the CFM editor in AEM - Part 3

Introduction
In this blog post, we will explain how you can add a custom validator with custom JavaScript code to your Content Fragment elements/fields.
In order to do so, we need to add custom properties to the Content Fragment Editor and also add the custom validator code. Follow the steps below to create your own custom validator.
Please be aware that this tutorial has not been made for the Universal Editor in Edge Delivery Services but only for the "classic" AEM Content Fragment Editor.
(Tested with AEM 6.5.20)
Step 1 - Add validator name as custom property
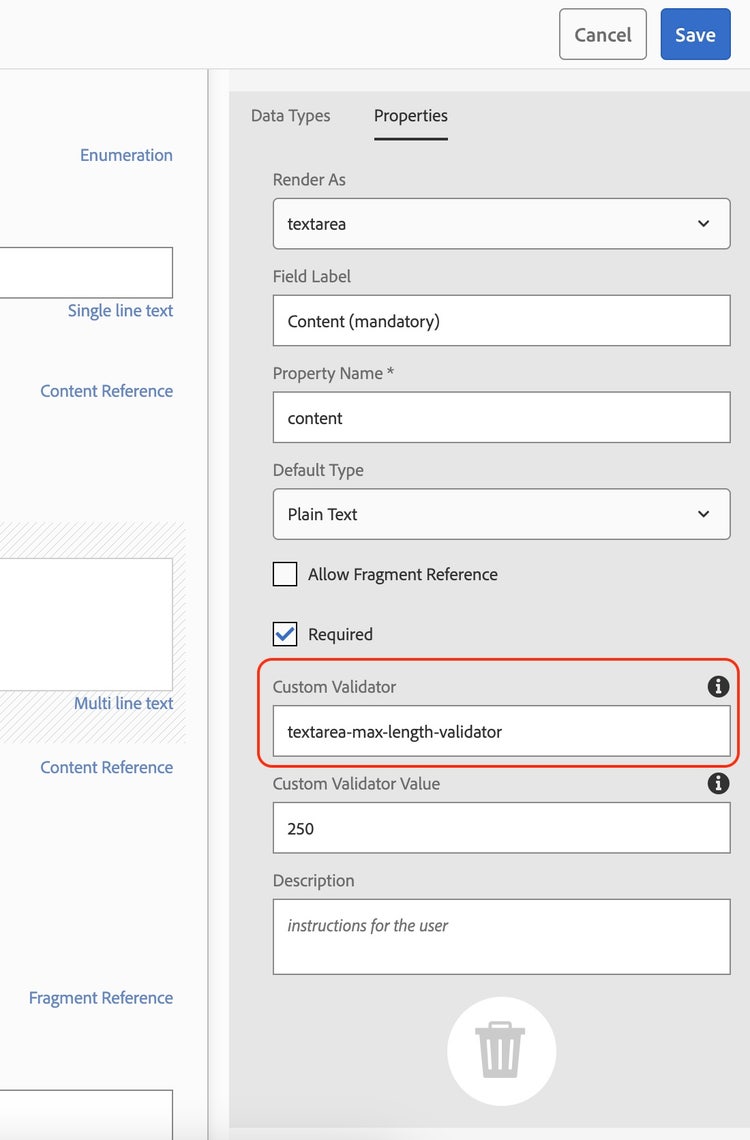
To add a custom validator to an element inside the Content Fragment Editor, we need to extend the editor by letting the author add the validator name as a property field as shown on the screenshot.
This field does not exist out of the box so we need to create it first.
The code for the property field can be added here:
- /apps/dam/cfm/models/editor/components/datatypeproperties/customvalidation/customvalidation.jsp
<%@include file="/libs/granite/ui/global.jsp" %><%
%><%@ page session="false" contentType="text/html" pageEncoding="utf-8"
           import="com.adobe.granite.ui.components.formbuilder.FormResourceManager,
                 org.apache.sling.api.resource.Resource,
                 org.apache.sling.api.resource.ValueMap,
                 java.util.HashMap" %><%
    ValueMap fieldProperties = resource.adaptTo(ValueMap.class);
    HashMap values = new HashMap();
    values.put("granite:class",    "field-custom-validation-descriptor");
    values.put("fieldLabel",       i18n.get("Custom Validator"));
    values.put("name",             "./content/items/" + resource.getName() + "/granite:data/custom-validator");
    values.put("value",            fieldProperties.get("granite:data/custom-validator", String.class));
    values.put("fieldDescription", "The name of custom validator can be added here");
    FormResourceManager formResourceManager = sling.getService(FormResourceManager.class);
    Resource labelFieldResource = formResourceManager.getDefaultPropertyFieldResource(resource, values);
%>
You can see in this JSP file that we are adding all the values needed to store the validator name to an element in the Content Fragment.
The next step is adding this custom property to the actual field in the editor. In this case we will add it to the textarea.
Create a ".content.xml" file under
- /apps/settings/dam/cfm/models/formbuilderconfig/datatypes/.content.xml
to overwrite the corresponding file under /libs.
The content of the ".content.xml" looks like this:
<?xml version="1.0" encoding="UTF-8"?> <jcr:root xmlns:jcr="http://www.jcp.org/jcr/1.0" xmlns:nt="http://www.jcp.org/jcr/nt/1.0" jcr:primaryType="nt:unstructured">
<items jcr:primaryType="nt:unstructured">
<text-multi jcr:primaryType="nt:unstructured" fieldProperties="[mvfields,multieditorfield,maptopropertyfield,multieditordefaultfield,rtemodelpickerfield,
requiredfield,translatablefield,customvalidation]" />
</items>
</jcr:root>
Disclaimer:
Please be careful when overwriting files/properties of the /libs folder. Always make sure that you have the most current changes also in your file in /apps.
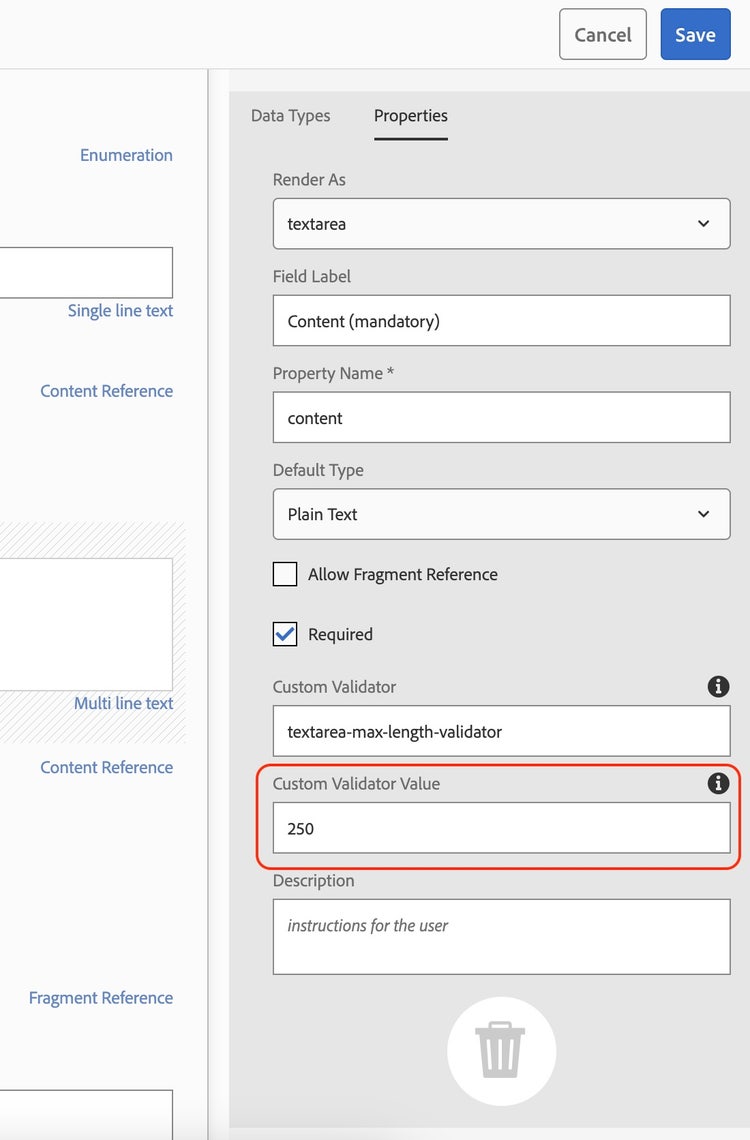
Step 2 - Add validator value as custom property
The code for the property field can be added here:
- /apps/dam/cfm/models/editor/components/datatypeproperties/customvalidation/customvalidationvalue.jsp
<%@include file="/libs/granite/ui/global.jsp" %><%
%><%@ page session="false" contentType="text/html" pageEncoding="utf-8"
           import="com.adobe.granite.ui.components.formbuilder.FormResourceManager,
                org.apache.sling.api.resource.Resource,
                org.apache.sling.api.resource.ValueMap,
                java.util.HashMap" %><%
    ValueMap fieldProperties = resource.adaptTo(ValueMap.class);
    HashMap values = new HashMap();
    values.put("granite:class",    "field-custom-validation-value-descriptor");
    values.put("fieldLabel",       i18n.get("Custom Validator Value"));
    values.put("name",             "./content/items/" + resource.getName() + "/granite:data/custom-validator-value");
    values.put("value",            fieldProperties.get("granite:data/custom-validator-value", String.class));
    values.put("fieldDescription", "The value (if needed) of custom validator can be added here");
    FormResourceManager formResourceManager = sling.getService(FormResourceManager.class);
    Resource labelFieldResource = formResourceManager.getDefaultPropertyFieldResource(resource, values);
%>
Now let's add the new custom datatype again to the textarea field by adding it to this file again:
- /apps/settings/dam/cfm/models/formbuilderconfig/datatypes/.content.xml
The content of the file looks like this after adding "customvalidationvalue":
<?xml version="1.0" encoding="UTF-8"?> <jcr:root xmlns:jcr="http://www.jcp.org/jcr/1.0" xmlns:nt="http://www.jcp.org/jcr/nt/1.0" jcr:primaryType="nt:unstructured">
<items jcr:primaryType="nt:unstructured">
<text-multi jcr:primaryType="nt:unstructured" fieldProperties="[mvfields,multieditorfield,maptopropertyfield,multieditordefaultfield,rtemodelpickerfield,
requiredfield,translatablefield,customvalidation,customvalidationvalue]" />
</items>
</jcr:root>
Tip
To ensure that only the correct item is overwriten, use the following filter.xml statement:
<filter root="/apps/settings/dam/cfm/models/formbuilderconfig/datatypes/item/text-multi"/>
Step 3 - Create the custom validator
We will create a max length validator for a textarea field. This field is special because it can contain plaintext, markup and richtext with HTML tags.
To keep the example simple we will only consider the HTML option.
The code for the validator looks like this:
/**
 * Custom validator for textbox that checks the length of the text.
 * HTML-Tags are not counted
 *
 * Usage
 * -----
 * Add this to the Content Fragment Model field:
 *
 */
(function ($, window) {
    'use strict';
    const VALIDATOR_ID = 'textbox-maxlength-validator';
    // Add Custom Validation / ErrorUI
    const registry = $(window).adaptTo("foundation-registry");
    registry.register('foundation.validation.validator', {
        selector: "[data-custom-validator='" + VALIDATOR_ID + "']",
        validate: function(el) {
            const maxlength = parseInt(el.getAttribute('data-custom-validator-value'));
            if(el.value && el.value.replace(/<[^>]+>/g, '').length > maxlength) {
                return Granite.I18n.get('Error: The text must not exceed {0} characters.', maxlength);
            }
        },
        show: function(el, message, ctx) {
            // modify appearance of div[contenteditable]
            const $parent = $(el).parent();
            const $input = $parent.find("[contenteditable=\"true\"]");
            $input.addClass("is-invalid");
            if (!$parent.find('.coral-Form-errorlabel').length){
                const $label = document.createElement("label");
                $label.innerHTML = message;
                $label.classList.add("coral-Form-errorlabel");
                const att = document.createAttribute("tabindex");
                att.value = "0";
                $label.setAttributeNode(att);
                $parent.append($label);
            }
        },
        clear: function(el, ctx) {
            // reset style of div[contenteditable]
            const $parent = $(el).parent();
            const $input = $parent.find("[contenteditable=\"true\"]");
            $input.removeClass("is-invalid");
            $input.removeAttr("style");
            // remove error message field
            const $label = $parent.find(".coral-Form-errorlabel");
            $label.remove();
        }
    });
}(jQuery, window));
- In the code you can see the VALIDATOR_ID, this will be used in the Content Fragment Editor as the name of the validator. In our case it's "textbox-maxlength-validator"
You can add the file to a clientlib folder and add the category "dam.cfm.authoring.contenteditor.v2" like this:
<?xml version="1.0" encoding="UTF-8"?>
<jcr:root xmlns:cq="http://www.day.com/jcr/cq/1.0" xmlns:jcr="http://www.jcp.org/jcr/1.0"
jcr:primaryType="cq:ClientLibraryFolder"
categories="dam.cfm.authoring.contenteditor.v2" />
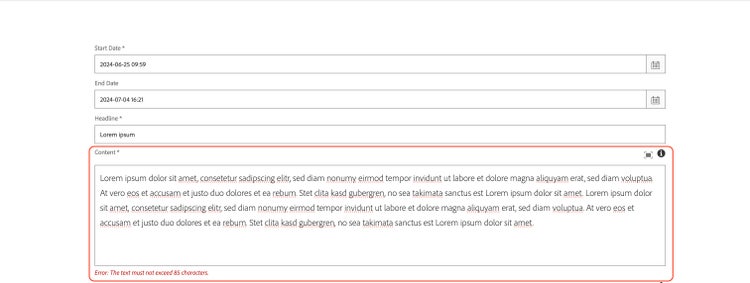
And et voila we can now add a custom validator to our fields inside the content fragment models and even specify a custom value for it. In our case it's a simple text length validator for the text area field, but it could be something way more complex of course.
This is the end result then
If you want to know how to extend the Tag field to enable "forceSelection" or how to add a custom before-after date validator you can click here: