Build serverless web-applications with AWS

AWS offers a powerful suite of tools that allow developers to build scalable, cost-effective, and highly available applications with minimal operational overhead.
In this blog, we will explore a combination of AWS services to create a serverless web application, while also highlighting the benefits for businesses in terms of cost, scalability, and agility.
Why Serverless?
Serverless architectures allow you to build and run applications without managing servers. This approach offers the following benefits:
-
Cost Efficiency: Pay only for the resources you actually use, without the need to maintain idle servers.
-
Scalability: Serverless applications automatically scale with demand, without the need for complex infrastructure management.
-
Faster Time to Market: Focus on writing code rather than managing infrastructure, which accelerates development and deployment cycles.
-
Reduced Operational Overhead: AWS takes care of much of the underlying infrastructure, reducing the need for dedicated operations teams.
Business Benefits
-
Cost Reduction: With a serverless approach, you eliminate the need for traditional server management, reducing infrastructure costs and allowing you to pay only for what you use.
-
Faster Innovation: Developers can focus on writing code and building features instead of managing infrastructure, leading to faster product iterations and quicker time to market.
-
Global Reach: AWS's global infrastructure allows your application to scale across regions, providing high availability and low-latency experiences for users worldwide.
-
Business Agility: Serverless architecture supports rapid development cycles, enabling businesses to adapt quickly to market changes, customer feedback, and new opportunities.
How to build?
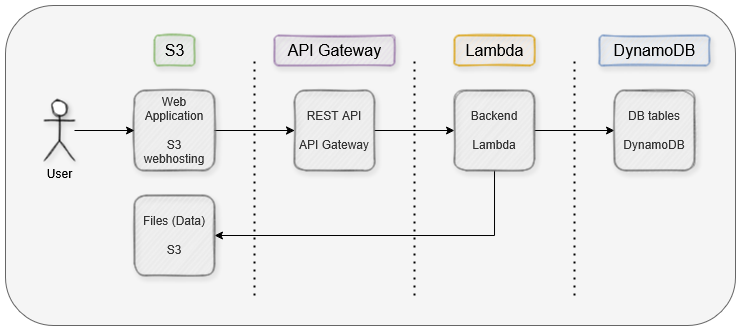
We focus on four specific AWS services to build a fully serverless web application. Let’s see how these services can work together:
-
Web Application: The user interacts with the web application. The web application build is stored in an S3 bucket and made publicly accessible via static web hosting. It sends requests to the REST API.
-
REST API: Using API Gateway, it routes incoming requests from the web application to the appropriate Lambda function.
-
Backend: Once a request hits the Lambda function, it processes the request, interacts with DynamoDB and/or S3 to fetch data, performs any business logic, and returns a valid response for API Gateway.
-
DB Tables: The data needed for the application is stored in DynamoDB tables. The backend Lambda functions need the proper permissions to access and read or write data.
-
Files (Data): Application-related data such as documents or images can be stored in and served from S3. Again, the backend Lambda functions need the appropriate permissions to access and read or write the data.
Each of these AWS services scales automatically as traffic increases. This ensures that your web application can handle millions of users without manual intervention, reducing overhead for DevOps teams and minimizing costs for your business.
AWS Services in detail
Now, let’s explore four AWS services in detail to build a fully serverless web application. For each of these services, there is a tutorial explaining how to implement them using the AWS Console.
1. DynamoDB
DynamoDB is a fully managed NoSQL database that provides fast and predictable performance with seamless scalability.
Why DynamoDB?
-
Fully Managed: AWS handles scaling, backups, patching, and other maintenance tasks.
-
Highly Scalable: DynamoDB can handle large amounts of data with automatic scaling, making it ideal for applications with unpredictable traffic.
-
Low Latency: DynamoDB is designed to provide consistent and fast performance, which is crucial for web applications with a large user base.
Tutorial
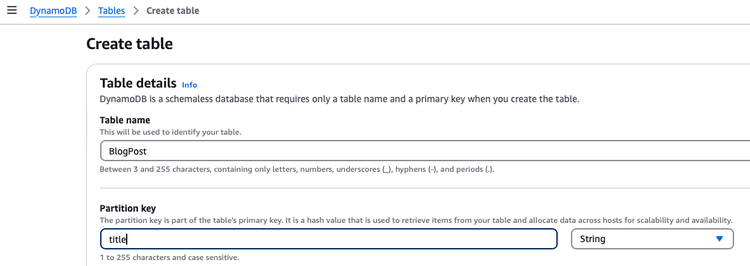
Setting up a DynamoDB table in AWS is a straightforward process. Here’s a step-by-step guide to help you create a table and insert items into it:
First, you need to sign in to the AWS Management Console and access the DynamoDB service.
Create a new table
-
Click on the Create Table button.
-
Enter the Table Name.
-
Define the Partition Key (and optionally, the Sort Key). For example:
- Partition Key: title (String)
-
Click Create Table.

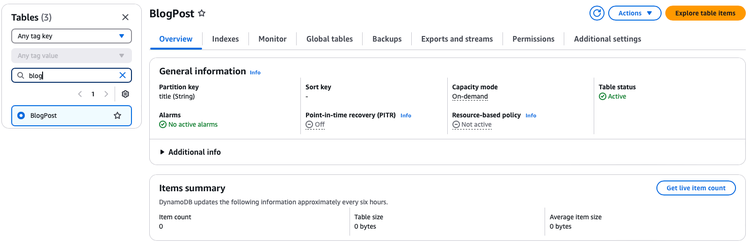
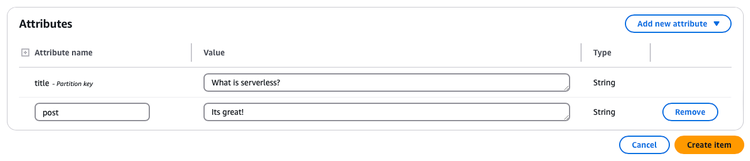
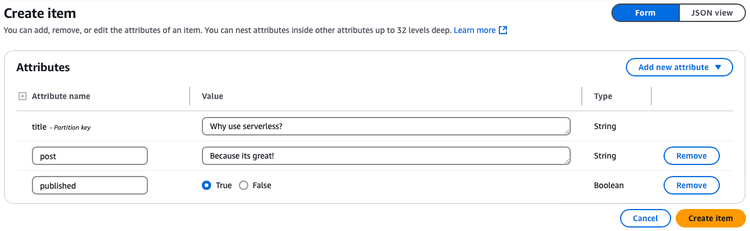
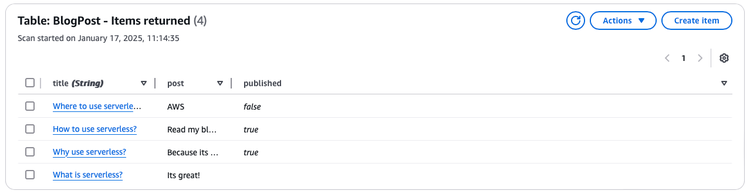
Add Items to Your Table
Once the table is created, you can add items to it.
1. In the DynamoDB dashboard, click on Tables and select your newly created table.
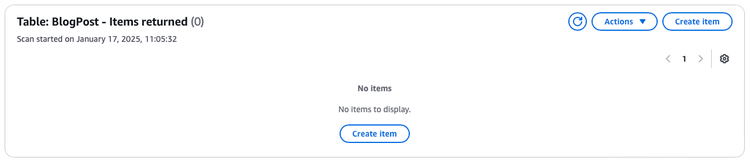
3. Click on Create item.
4. Use the JSON or Table view to enter your item attributes.


2. Lambda
Lambda is one of the key pillars of a serverless architecture in AWS. It allows you to run your code without provisioning or managing servers.
Why Lambda?
-
No Server Management: Write your code and let AWS handle the rest.
-
Event-Driven: Lambda functions are triggered by various AWS services like API Gateway, DynamoDB, and S3, making them ideal for serverless applications.
-
Cost-Effective: You only pay for the compute time you use, reducing costs for low-traffic or burstable workloads.
Tutorial
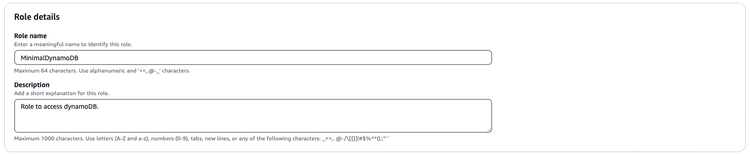
Before we create our Lambda function, we first need to create a role with the necessary permissions to allow our Lambda function to access the DynamoDB table. Here’s a step-by-step guide on how to create a role with the proper permissions:
First, you need to sign in to the AWS Management Console and access the IAM service.
Create policy
-
Select Policies
-
Click on Create policy
-
Select the service DynamoDB
-
In Policy Editor switch to JSON and use this:
{
"Version": "2012-10-17",
"Statement": [
{
"Sid": "",
"Action": [
"dynamodb:DeleteItem",
"dynamodb:GetItem",
"dynamodb:PutItem",
"dynamodb:UpdateItem",
"dynamodb:Query",
"dynamodb:Scan"
],
"Effect": "Allow",
"Resource": "*"
},
{
"Sid": "",
"Action": [
"logs:CreateLogGroup",
"logs:CreateLogStream",
"logs:PutLogEvents"
],
"Effect": "Allow",
"Resource": "*"
}
]
}
5. Click on Next button
6. Put in a name for your permission and an optional description
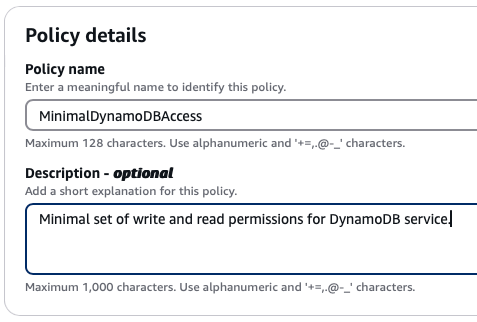
7. Click Create Policy button
Create role
1. Select Roles
2. Click on Create role button
3. Use Custom trust policy as trusted entity type and put in this statement
{
"Version": "2012-10-17",
"Statement": [
{
"Sid": "",
"Effect": "Allow",
"Principal": {"Service": "lambda.amazonaws.com"},
"Action": "sts:AssumeRole"
}
]
}
4. Click Next button
5. Search and check our new created policy

6. Click Next button
7. Put in a Role name and Description
- Click on Create role button
Now let's create the lambda function for our backend functionality. Here’s a step-by-step guide on how to set up a Lambda function.
First, you need to sign in to AWS Management Console and access the Lambda service.
Create Lambda function
- Click on the Create function button.
- Choose Author from scratch.
- Put in a Function name and select your preferred Runtime (Determines the programming language you want to use)
- Expand Change default execution role, select Use an existing role and select our create role
5. Click on Create function.
6. Write your code in the lambda function depending on the runtime you have chosen.
In this example we use nodejs.
import { DynamoDBDocumentClient, ScanCommand} from "@aws-sdk/lib-dynamodb";
import { DynamoDBClient } from "@aws-sdk/client-dynamodb";
// dynamo client
const client = new DynamoDBClient({});
const dynamo = DynamoDBDocumentClient.from(client);
export const handler = async (event, context) => {
// used via API Gateway query paramter
const published = event.queryStringParameters?.published === "true";
// scan the BlogPost table and filter by published attribute
const response = await dynamo.send(
new ScanCommand({
TableName: "BlogPost",
FilterExpression: `#p = :p`,
ExpressionAttributeNames: {
"#p": "published"
},
ExpressionAttributeValues: {
":p": published
}
})
);
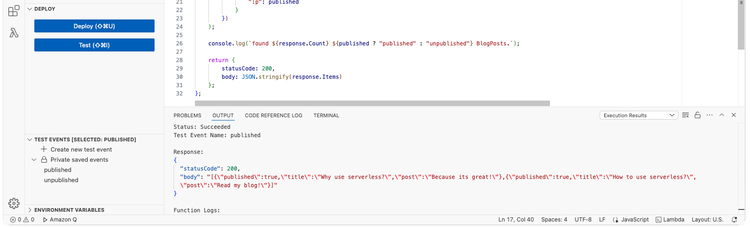
console.log(`found ${response.Count} ${published ? "published" : "unpublished"} BlogPosts.`);
return {
statusCode: 200,
body: JSON.stringify(response.Items)
};
};
7. If you have finished your code or want to test it, click the Deploy button
8. For testing click the Test button and select a Test Event or create a new one
Test Event Example:
{
"queryStringParameters": {
"published": "true"
}
}
3. API Gateway
API Gateway makes it easy to create, publish, and maintain APIs that can securely interact with various backend services, such as Lambda functions or DynamoDB.
Why API Gateway?
-
Scalability: Automatically scales to handle hundreds of thousands of concurrent API calls.
-
Security: Offers built-in mechanisms for securing APIs with AWS Identity and Access Management (IAM), AWS Cognito, and API keys.
-
Ease of Integration: API Gateway integrates seamlessly with other AWS services, including Lambda, DynamoDB, and S3.
Tutorial
With API Gateway, you will be able to provide the REST interface used by your application. Here’s a step-by-step guide on how to set up an API Gateway.
First, you need to sign in to the AWS Management Console and access the API Gateway service.
Create API Gateway
1. Navigate to the API Gateway service in the AWS Management Console.
2. Click on Create API and choose an appropriate option (HTTP API or REST API).
3. For a simple setup, select HTTP API.
4. Click on Build.
5. Click on Add integration and select Lambda.
6. From the dropdown, select the Lambda function you created earlier.
7. Put in a name
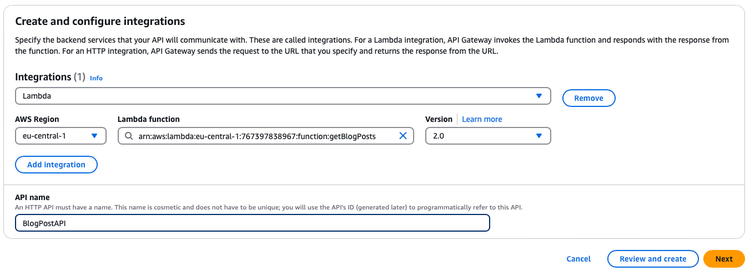
8. Click on Next button
9. Configure the Route
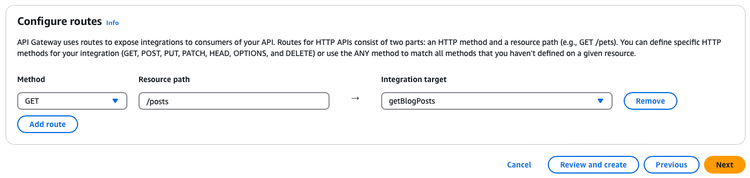
10. Click on Review and create to save the route.
Deploy and test the API
-
Per default the stage $default was used with automatic deployment.
-
Switch to Stages and select $default
-
Note down the Invoke URL
-
Use a tool like Postman or simply a web browser to send a request to your API Gateway.
-> GET {your-invocation-url}/posts?published=true -
You should receive a JSON response from your Lambda function.

4. S3
S3 can handle large amounts of data and, in our case, provides static web hosting for an easy way to provide a publicly available web application.
Why S3?
-
Scalable and Durable: S3 provides 99.999999999% durability, making it ideal for storing critical data.
-
Integration with Other AWS Services: S3 works seamlessly with Lambda, DynamoDB, and API Gateway, enabling smooth workflows for storing and retrieving files.
-
Cost-Effective: You only pay for the storage you use, and there are no upfront costs.
Tutorial
Setting up the web application can be done with multiple frameworks (e.g., React, Angular, etc.). In this guide, we’ll create a simple index.html file that fetches data from our REST API and hosts it using AWS S3 for web hosting.
Create index file
Create a file named index.html and use the following sample code to set it up:
<!DOCTYPE html>
<html lang="en">
<head>
<meta charset="UTF-8">
<meta name="viewport" content="width=device-width, initial-scale=1.0">
<title>Blog</title>
</head>
<body>
<h1>Blog posts</h1>
<button id="loadButton">Get posts</button>
<div id="data"></div>
<script>
document.getElementById('loadButton').addEventListener('click', function() {
fetch('{your-invocation-url}/posts?published=true')
.then(response => response.json())
.then(data => {
const dataDiv = document.getElementById('data');
dataDiv.innerHTML = JSON.stringify(data, null, 2);
})
.catch(error => {
console.error('Error fetching data:', error);
});
});
</script>
</body>
</html>
Setup S3 webhosting
1. Log into AWS Management Console:
- Go to the S3 service.
2. Create an S3 Bucket:
- Click on Create bucket.
- Choose a unique name for your bucket and select a region.
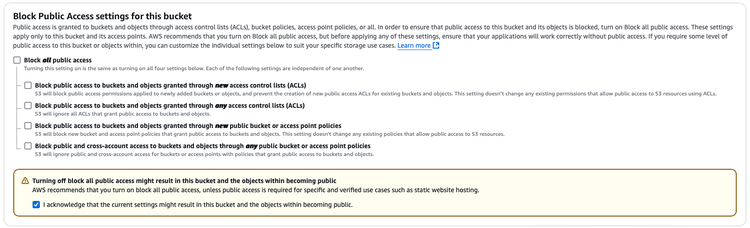
- Uncheck Block all public access if you want your webpage to be publicly accessible and acknowledge this action.
- Click Create bucket.
3. Upload your index.html File:
- Open the newly created bucket.
- Click on the Upload button.
- Drag and drop your index.html file or click Add files to upload it.
4. Enable Static Website Hosting:
- Go to the Properties tab of your bucket.
- Scroll down to Static website hosting and click Edit.
- Enable the option and specify index.html as the index document.
- Click on Save changes and scroll down to see your endpoint URL.
5. Set Proper Permissions:
- Go to the Permissions tab.
- Click on Edit for Bucket Policy and add the following policy to allow public access to your files:
{
"Version": "2012-10-17",
"Statement": [
{
"Sid": "PublicReadGetObject",
"Effect": "Allow",
"Principal": "*",
"Action": "s3:GetObject",
"Resource": "arns3:your-bucket-name/* " }
]
}
- Make sure to replace your-bucket-name with the actual name of your S3 bucket and click Save changes.
Handle CORS
In our case, we will run into CORS issues since we’re not serving everything from a specific domain. To handle that, we’ll simply allow CORS for our new website endpoint.
1. Log into AWS Management Console:
- Go to the API Gateway service.
2. Configure CORS
- Select our newly created API
- Switch to CORS and click on Configure
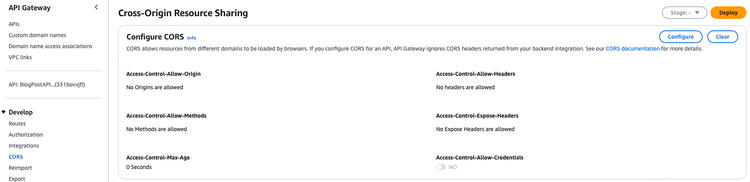
- Add your website endpoint URL into Access-Control-Assow-Origin and click Add button
- On Access-Control-Allow-Methods select *
- Set Access-Control-Max-Age to 300
- Click Save button
Test Your Website
Open the endpoint URL provided in the Static Website Hosting section. You should see your web page with the “Get posts” button to load data. Click the button to execute the API call and display the returned data.
Conclusion
Given the fact that Lambda code can be written in many different programming languages depending on the environment you choose, there is high flexibility when searching for a backend developer.
Building a serverless web application with AWS services allows businesses to focus on innovation and growth without being bogged down by infrastructure management. The ability to scale automatically, minimize costs, and accelerate development cycles offers significant advantages, making serverless a compelling choice for modern web applications.
Links
Check out our blog about Microservices and how to develop them.